The barbell row – also known as the bent-over row – is a horizontal pulling movement where you pull a barbell toward you while your torso is hinged forward. It works the back (lats, traps, rhomboids), the arms (biceps, forearms), and the stabilising muscles (core, lower back, glutes) all at once.
Its main benefit is building back thickness (how your back looks from the side), complementing vertical pulling exercises such as pull-ups and lat pulldowns.
Start Here
- Streetlifting Program
- Weighted Muscle Up Program
- Weighted Pull-Up Program
- Weighted Dip Program
- Squat Program
What is the barbell row?
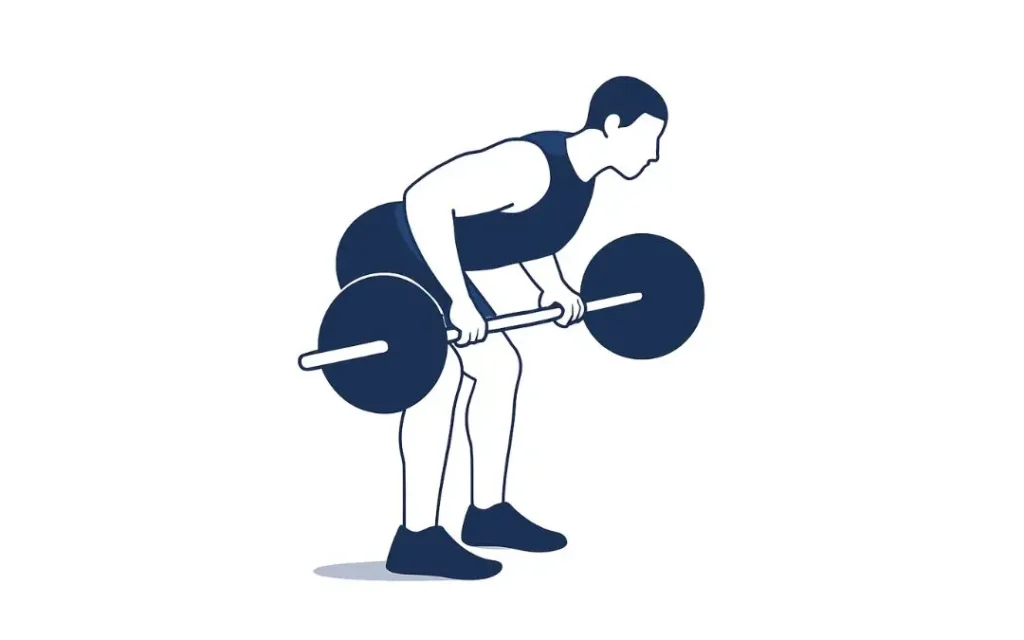
The barbell row, also called the bent-over barbell row, is a horizontal pulling movement where you pull a barbell toward you with your torso hinged forward. It trains the back (lats, traps, rhomboids), the arms (biceps, forearms), and the stabilising muscles (core, lower back, glutes) in synergy.
Its main advantage is developing back thickness (how your back looks from the side), as a complement to vertical pulling exercises (pull-ups, lat pulldowns).
How to perform the barbell row
1. Starting position
- Stand with your feet hip-width apart, knees slightly bent.
- Hinge toward the bar, keeping your back straight and knees softly bent.
- Grip the bar with your preferred grip (shoulder-width in general).
- Slightly raise your chest (bar at knee height or between the knees depending on the setup).
- Tilt your torso forward under control until the bar hangs in front of you with arms extended. Keep your back straight and your shoulder blades slightly retracted.
2. The pull
- With your torso fixed, pull the bar upward by driving your elbows back and slightly upward.
- Focus on squeezing your shoulder blades together as the bar rises.
- Pull until the bar touches – or nearly touches – your navel (or the lower sternum, depending on your build).
- Let your breathing follow the movement (typically inhale on the pull, exhale on the way down).
3. Key checkpoints
- Your torso must not sway during the rep: no momentum (control the trunk via bracing).
- Keep your back straight with a natural arch – never rounded.
- Elbows stay close to the body or slightly flared depending on the variation, but never too wide.
- The movement must be smooth, with no « bounce » off the plates.
Anatomy of the movement: muscles worked
| Muscle | Role / function during the movement |
|---|---|
| Latissimus dorsi | Primary muscle responsible for back « depth » |
| Traps and rhomboids | Retract the shoulder blades, support the upper back |
| Biceps and forearms | Especially in supinated grip, flex the elbow |
| Lower back / spinal erectors | Stabilise the spine statically |
| Core / abdominals | Maintain trunk posture |
| Glutes and hamstrings | Contribute to stability of the hinged torso |
Maintaining a natural arch and solid bracing is essential to protect the lower back and transfer force efficiently.
Benefits of the barbell row for building your back
The barbell row is an effective exercise for developing back strength and muscle mass, just like its variation the inverted row. Here are its main benefits:
- Increased back thickness: ideal for a powerful, well-developed back.
- Improved posture: strengthens postural muscles and helps prevent a rounded back.
- Stronger arms and forearms: builds grip strength and recruits the biceps.
- Versatility: adaptable to different variations (supinated grip, pronated grip, wide or close) to target muscles differently.
What weight to use and how to progress
- Always start with an empty bar or a very light load to master the technique first.
- Choose a weight that lets you complete all your reps with control – you should theoretically be able to do one more rep without breaking your posture.
- For example, if you are aiming for 4 sets of 8-12 reps, the ideal weight is one that would allow a 13th rep in theory.
- Avoid overloading: too heavy a weight leads to cheating (swinging, leg drive) and increases injury risk.
- To progress, you can increase the load, the number of sets or reps, slow down the eccentric phase (lowering), or add variations.
- Plan progressive overload phases (adding 1-2.5 kg each cycle) alongside recovery phases.
How to include the barbell row in your program
- Frequency: 1-2 times per week for back, depending on total session volume.
- Combine horizontal + vertical pulling: pair the barbell row with pull-ups or vertical pulldowns to cover all pulling angles.
- Rotate variations: for example:
- Week 1: pronated-grip barbell row
- Week 2: supinated-grip barbell row
- Week 3: unilateral dumbbell row
- Week 4: T-bar row or cable row
- Progression: gradually increase load, volume (sets/reps), or time under tension.
Common mistakes to avoid
To get the most out of the barbell row, avoid these common mistakes:
- Rounding the back: risk of lower back injury. Always keep your back straight.
- Pulling with your arms only: focus on contracting your back muscles.
- Using too much weight: choose a load suited to your level for clean technique.
- Neglecting range of motion: lower the bar fully and pull it to your navel for optimal muscle recruitment.
- Losing control: avoid jerky movements and maintain a controlled tempo.
Coach’s conclusion
The barbell row is a fundamental exercise for building a strong, muscular back. Performed with good technique and an appropriate load, it improves posture and strengthens the entire upper body. Remember to warm up before your session and maintain correct posture throughout the movement to stay injury-free.
More back exercises to explore
- Assisted pull-up
- Dead hang
- Band-assisted pull-ups: the first step toward unassisted pull-ups
- How to do chin-ups and build your biceps with the supinated-grip pull-up
- Rings muscle up
- TRX row
- Close-grip lat pulldown
- Inverted row
- Neutral-grip pull-up
- Renegade row
Program or coaching?
Find your ideal training format in 1 minute
Answer 4 questions and receive a personalised recommendation based on your level and goals.
1 min flat | Tailored result | Free